02-2. 레이어 쌓기, Mesh
2019.04.20추상화
앞선 튜토리얼에서는 WebGL의 API를 사용하여 화면에 직사각형을 그려 보았습니다. 이와 같은 방식으로 복잡한 수백만 개의 모델을 렌더링하는 것도 가능은 합니다만… 과연 이것이 좋은 전략일까요?
/* src/main.ts */

const data1 = new Float32Array([...]);
const vbo1 = gl.createBuffer();
gl.bindBuffer(gl.ARRAY_BUFFER, vbo);
gl.bufferData(gl.ARRAY_BUFFER, data.buffer, gl.STATIC_DRAW);
gl.bindBuffer(gl.ARRAY_BUFFER, null);

const data2 = new Float32Array([...]);
...
...
...
WebGL API를 사용하는 모든 코드를 src/main.ts에 넣는 것보다는, 적절하게 코드를 나누고 반복해서 사용할 수 있도록 디자인하는 것이 바람직한 방법일 것입니다. 이를 위해, VAO와 BO를 추상화한 Mesh 클래스를 정의하도록 하겠습니다. Mesh 클래스의 내부는 WebGL API들로 구현되어 있으나, 이 API들을 내부 구현으로 감추어 외부에서 사용할 때는 이 API들을 직접 사용하지 않아도 필요한 기능을 사용할 수 있습니다.
최종적으로는, WebGL이라는 low-level 라이브러리를 이용하기 편리하게 작성한 Mesh와 같은 클래스들을 묶어 하나의 라이브러리처럼 관리합니다.
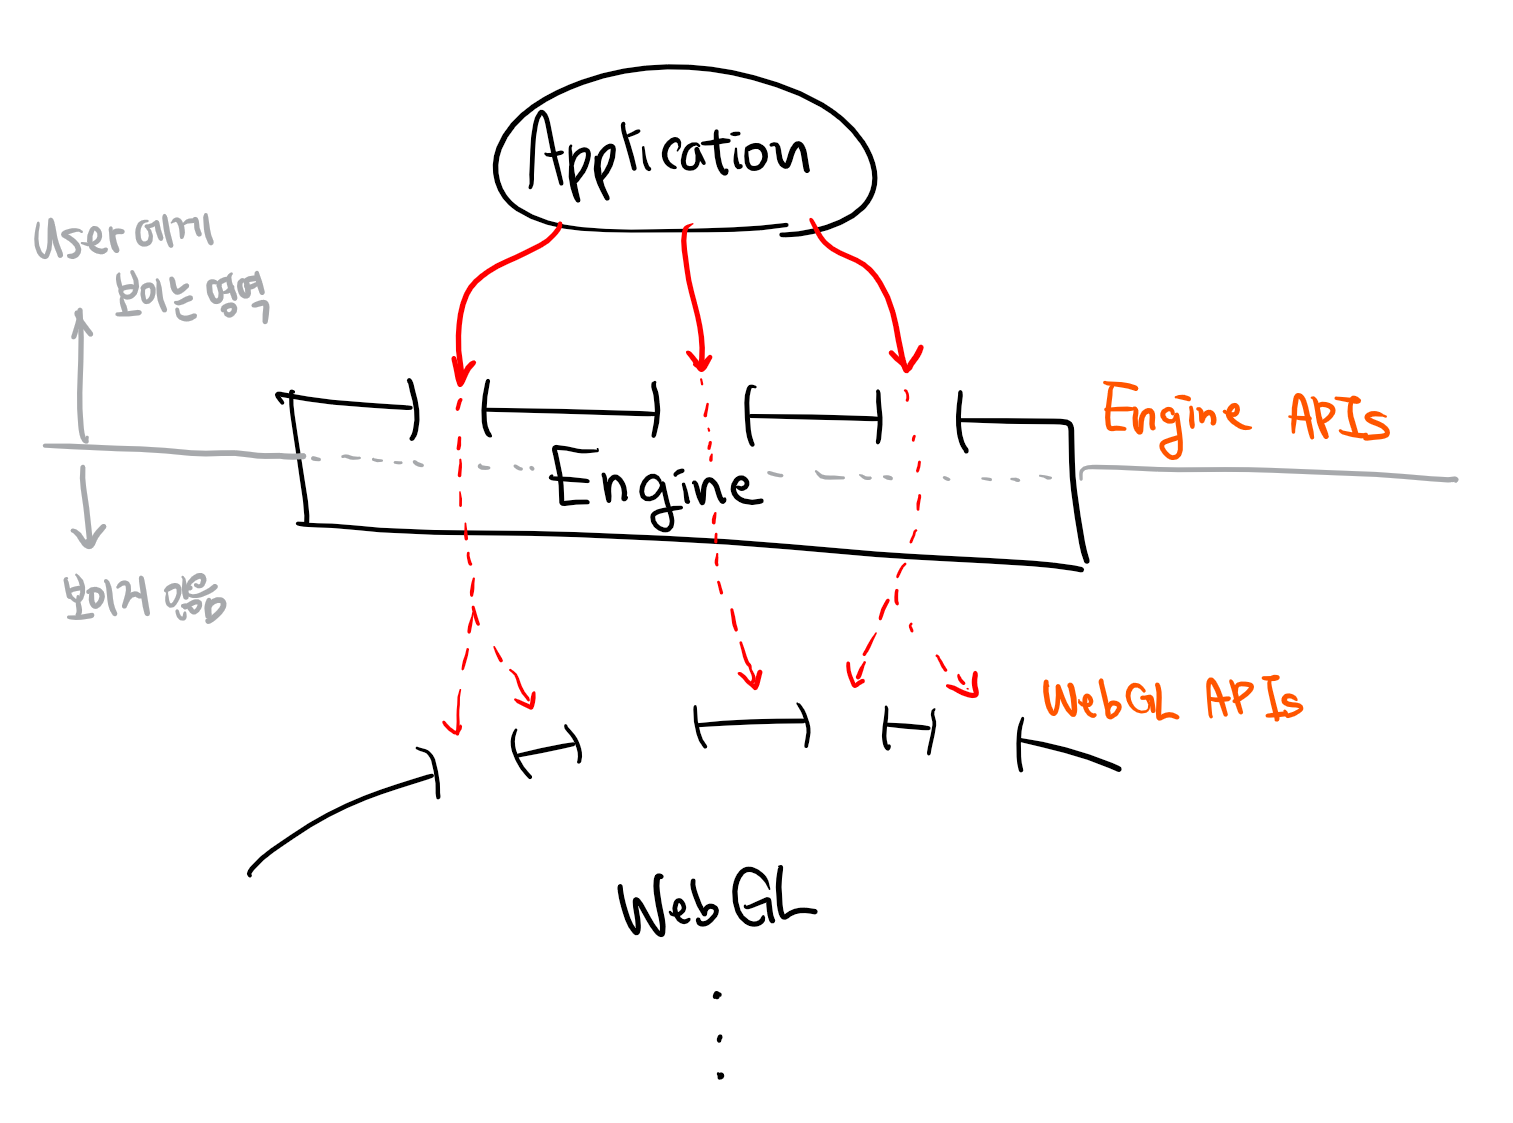
src/ 디렉토리 내에 engine/ 디렉토리를 만들어 주세요. 앞으로 추상화 작업을 진행할수록, WebGL API를 사용하는 코드는 엔진 내로 감춰지고 src/main.ts 어플리케이션에서는 엔진 라이브러리를 활용하는 방식으로 디자인 할 계획입니다.
Mesh 클래스
src/engine/ 디렉토리 내의 components/Mesh.ts 파일에서 작업합니다.
.
├── src
│   ├── engine
│   │   └── components
│   │       └── Mesh.ts
│   ├── main.ts
│   └── global.ts
├── index.html
├── style.css
...
Mesh 클래스는 VAO와 BO와 관련된 WebGL API들을 감싸는 클래스입니다. 이 API들은 다음과 같이 분류할 수 있습니다.
- 생성
gl.createVertexArray()gl.createBuffer()
- 메모리 전송
gl.bufferData(target, data, usage)
- 설정
gl.vertexAttribPointer(index, size, type, normalized, stride, offset)gl.enableVertexAttribArray(index)gl.disableVertexAttribArray(index)
- 렌더링
gl.drawArrays(mode, first, count)
- 삭제
gl.deleteVertexArray()gl.deleteBuffer()
분류를 토대로 클래스를 작성합니다.
import global from 'global';

export default class Mesh {

    _gl: WebGL2RenderingContext;
    _vao: WebGLVertexArrayObject;
    _vbo: WebGLBuffer;
    _count: GLsizei;
    _drawMode: GLenum;
    _deleted: boolean;
    ...
}
클래스가 가지고 있는 private 변수(엄밀히 말하면, javascript에는 private 변수가 없지만 private 변수처럼 사용할 것입니다.)들입니다. VAO와 VBO (Vertex BO), vertex 개수 등을 가지고 있습니다.
constructor() {
    this._gl = global.get('gl');
    this._vao = this._gl.createVertexArray();
    this._vbo = this._gl.createBuffer();
    this._count = 0;
    this._drawMode = this._gl.TRIANGLES;
    this._deleted = false;
}
클래스 생성자에서는 VAO와 VBO를 만들고 다른 값들도 초기화 해줍니다.
updateVertexBuffer(buffer: ArrayBuffer): void {
    if (this._deleted)
        return;
    this._gl.bindBuffer(this._gl.ARRAY_BUFFER, this._vbo);
    this._gl.bufferData(this._gl.ARRAY_BUFFER, buffer, this._gl.STATIC_DRAW);
    this._gl.bindBuffer(this._gl.ARRAY_BUFFER, null);
}
GPU에 데이터를 전송하는 메소드입니다.
configure(attributes: Array<[GLenum, number]>): void {
    if (this._deleted)
        return;
    if (attributes.length == 0)
        return;

    this._gl.bindBuffer(this._gl.ARRAY_BUFFER, this._vbo);
    this._gl.bindVertexArray(this._vao);

    const type2size = (type: GLenum): GLsizei => {
        if (type == this._gl.BYTE || type == this._gl.UNSIGNED_BYTE)
            return 1;
        if (type == this._gl.SHORT || type == this._gl.UNSIGNED_SHORT || type == this._gl.HALF_FLOAT)
            return 2;
        return 4;
    };

    const stride = attributes.map(([type, size]) => type2size(type) * size).reduce((s, x) => s + x);
    let offset = 0;
    for (const [index, [type, size]] of Object.entries(attributes)) {
        this._gl.vertexAttribPointer(Number(index), size, type, false, stride, offset);
        this._gl.enableVertexAttribArray(Number(index));
        offset += type2size(type) * size;
    }

    this._gl.bindBuffer(this._gl.ARRAY_BUFFER, null);
    this._gl.bindVertexArray(null);
}
어플리케이션에서 Mesh의 원하는 vertex attribute들의 type과 size를 attributes 리스트에 담아 인자로 넘겨줍니다. (예를 들어, 우리가 진행하는 튜토리얼에서는 [[gl.FLOAT, 2]]가 되겠죠.) 이 리스트를 보면서 vertexAttribPointer로 각 attribute를 설정해 줍니다.
start(): void {
    if (this._deleted)
        return;
    this._gl.bindVertexArray(this._vao);
}

render(): void {
    if (this._deleted)
        return;
    this._gl.drawArrays(this._drawMode, 0, this._count);
}

stop(): void {
    if (this._deleted)
        return;
    this._gl.bindVertexArray(null);
}
start, render, stop 메소드를 분리하는 이유는 같은 모델을 여러 번 그리는 과정을 최적화하기 위함입니다. 이렇게 분리하면 매번 bind했다 풀었다 하지 않고, 처음과 마지막에만 start, stop을 부르고 중간에 render을 여러 번 호출하는 방식으로 구현할 수 있습니다.
delete(): void {
    if (this._deleted)
        return;
    this._gl.deleteBuffer(this._vbo);
    this._gl.deleteVertexArray(this._vao);
    this._deleted = true;
}
Mesh의 VAO와 VBO를 삭제하는 메소드입니다.
getDrawMode(): GLenum { return this._drawMode; }
setDrawMode(drawMode: GLenum): void { this._drawMode = drawMode; }

getCount(): GLsizei { return this._count; }
setCount(count: GLsizei): void { this._count = count; }

getVAO(): WebGLVertexArrayObject { return this._vao; }
getVBO(): WebGLBuffer { return this._vbo; }
그리고 private 변수에 접근할 수 있는 get/set 메소드도 구현합니다.
결과
Mesh 클래스를 활용하여 src/main.ts의 코드를 다듬어 봅시다. 기존의 코드에서 VAO와 BO 관련 API를 사용하는 부분을 모두 Mesh로 대체합니다.
먼저 Mesh 클래스를 import하고…
import global from 'global';
import Mesh from 'engine/components/Mesh';
...
초기화 부분에서 VAO, BO를 생성하고, 데이터를 넘겨주고, VAO와 BO를 연결하는 부분을 Mesh 클래스의 메소드를 호출하여 구현합니다.
const mesh = new Mesh();
mesh.updateVertexBuffer(new Float32Array([
    -0.5,  0.5, -0.5, -0.5,  0.5, -0.5,
     0.5, -0.5,  0.5,  0.5, -0.5,  0.5
]));
mesh.configure([[gl.FLOAT, 2]]);
mesh.setCount(6);
그리고 마지막에 그리는 부분에서 start, render, stop을 차례로 호출하여 직사각형을 그립니다.
mesh.start();
mesh.render();
mesh.stop();
결과는 앞 튜토리얼과 정확히 똑같지만, 어플리케이션 코드가 훨씬 깔끔해졌습니다!